• iPhone7 released

    Apple’s new iPhone 7 and iPhone 7 Plus to come with A10 Fusion 64 bit quad-core processor, new Black and Jet Black colours, AirPods instead 3.5 mm headphone jacks

  • Raspberry Pi Sells 10 Million Computers

    Raspberry Pi Foundation has announced that they have sold 10,000,000 Raspberry Pi single board computers since the first model was launched in 2012. An official Raspberry Pi Starter Kit has also been announced, which can be purchased online via authorized partners

  • Future Samsung Galaxy Phone

    Samsung patent shows smartphone running Android and Windows at the same time

Showing posts with label How To. Show all posts

How to Identify the New Galaxy Note7


Samsung has begun replacing the Galaxy Note7 with a battery manufacturing standard. To help users easily understand if they have a new device and use their new Galaxy Note7 with confidence, the company has introduced a Green battery icon that has been included in three specific software changes.


The new green battery icon will be visible on: 1) the Status Bar; 2) the Always On Display screen; and 3) the Power Off prompt screen, which can be accessed by long-pressing the power key.


Additionally, users can easily check if they are using the new Galaxy Note7 by looking for a square symbol on the label of the packaging box as below.


Our highest priority is the safety of our customers, and we strongly urge Galaxy Note7 users to immediately participate in the replacement program based on local availability.


*Battery icons’ color of the new Galaxy Note7 will be changed to green after Software update.


**All functionality, features, specifications and other product information provided in this document including, but not limited to, the benefits, design, pricing, components, performance, availability, and capabilities of the product are subject to change without notice or obligation.


How To Compress Drive To Save Disk Space Using NTFS Compression?


Microsoft Windows has abilities to compress your hard drive. The compression works for the drives formatted using the NTFS file system and for folders resting on an NTFS drive. You can also use NTFS compression on a pen drive by formatting it to NTFS.


The NTFS compression feature present in the Windows operating system comes handy when you want to squeeze your existing data to get some extra space. There are other useful methods for data compression but these require the data to be packed inside a zip or RAR file.


Shrinking files using NTFS compression will increase the workout done by your CPU while decompressing it. However, modern CPUs won’t give a sweat on this. Compressing the files won’t increase the access time. Instead, it may contribute lesser access time. This is because the files are first transferred to the RAM and then decompressed. A small-sized file could be transferred more quickly than a larger one.


An important point to be noted is that the compressions will only work for the stuff which can be compressed. This means that audio and video files, which are already compressed, won’t get shrunk considerably than the uncompressed ones like the word files and PDFs.


However, using NTFS compression on system files may not be beneficial to the health of your system. It may contribute to degradation in performance. It is not recommended to do so.
How To Compress Drive To Save Disk Space Using NTFS Compression?


The drive that needs to be compressed should be formatted to use the NTFS file system. External storage devices like USB drives are formatted using the FAT32 file system. So, you’ll have to reformat it in order to enable NTFS compression.


Here are the steps to enable NTFS compression in Windows:
Open My Computer/This PC.
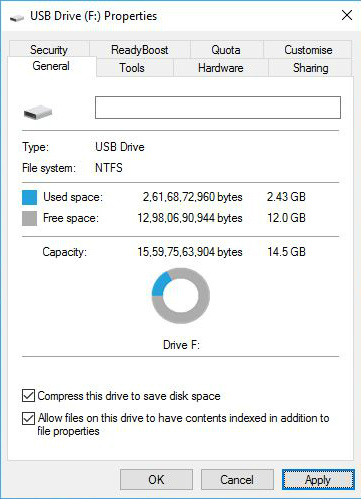
Right-click the desired drive and click Properties.
Tick the checkbox for Compress drive to save disk space. Click Apply.

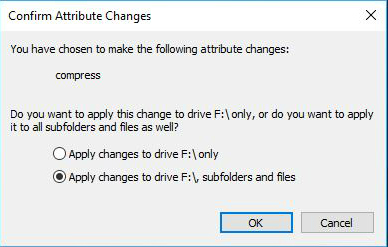
Tick Apply changes to folder, subfolder, and files. Click Ok. It will take some time depending the size of your drive.

To undo NTFS compression, untick the Compress drive to save disk space check box and follow similar steps.


Recommended: FAT32 vs. NTFS vs. exFAT – Difference Between Three File Systems
How to compress contents of a folder to save space?
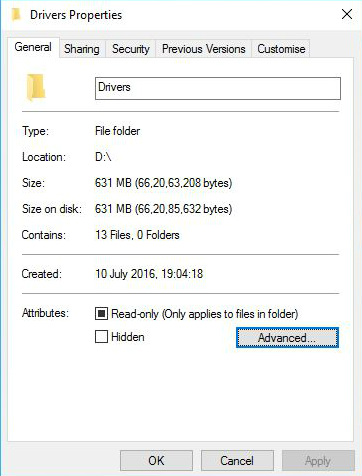
Go to the Properties of that folder.
Click Advanced.

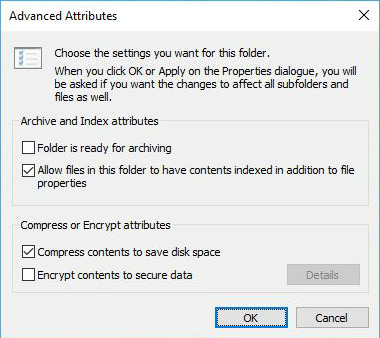
Tick Compress contents to save disk space.

Click Apply changes to this folder, sub folders and files. Click Ok.
To undo NTFS compression, follow similar steps and untick Compress contents to save disk space.


Using NTFS compression to compress drives won’t drastically reduce your disk size. But it is good in the situations when you are out of space and want to store some important data, and also for keeping the files which you don’t use very often.


If you have something to add, tell us in the comments below.

How to Repair/Fix a Corrupt SD Card


Here is how to repair and/or fix a corrupt SD Card

How to Preserve your important and precious data from being corrupted and recover from accidental deletions

SD cards are great as they are small in size, lightweight and versatile (you can store any type of data on them). But what happens when a SD card on which you stored your important files, becomes inaccessible or corrupt and what about a SD card whose entire data got wiped out for no apparent reason.

We all face such kind of situation when our smartphone/PC/laptop throws up a message that it can’t access the SD card. Such situations are scary as we don’t have any access to the important files stored on the SD card. At least for those who store important files/videos/images in their memory card).

However, almost every problem has a solution. There are solutions to each of the specific data loss case. Most common of them are provided below.

I just can’t access my SD card

This is one the most common issue that readers complain about. Maybe this is a problem with other hardware that is your computer’s USB port or the card reader you’re using. Try connecting your card reader on a different port of the same computer or do it with a different computer. Also, you can try using a different card reader.
The Computer Shows my card name but not the content

If in case the content of the card is not being shown, you can try this:


1. Open the search bar and type “cmd”.
2. Click on “Command Prompt” or “cmd.exe”
3. Type in “chkdsk /X /f sd card letter:” or “chkdsk sd card letter: /f “, for example,”chkdsk /X /f G:” or “chkdsk H: /f”.

Windows will check and fix the file system of the SD card. It will take a few minutes. If you see a message saying “Windows has made corrections to the file system” in the command window, then you’re done. Otherwise, you will have to use some third-party data recovery software.
Formatting the SD card

If the data contained on your card is not very useful or important, you can format the card to wipe all the bloating stuff.

To format your card, follow these steps:


1. Locate your SD card on your computer.( Usually its the last drive letter in “My Computer”)
2 Right click on its drive letter.
3. Select Format.
4. Select “Start”.
5. If you encounter any problem, retry with “Quick Format” box unchecked.
Using a data recovery software

The best way to get back all your important data will be to use a decent data recovery software. There are numerous software available. Some of them, which are considered to be “best-in-class” are listed.
1. Recuva (Experts recommend it as it is economic and does the job well)
2. Prosoft’s Data Rescue(Voted as best commercial data recovery software in 2016)
3.MiniTool Partition Recovery

These methods will help you get back your invaluable data back. Be sure to copy your data to a new SD card as soon as you recover your data as the problem you began with may trouble you again.

How To Put Multiple ISO Files In One Bootable USB Disk | Create Multiboot USB Disk


This article includes a method to create a multiboot flash drive allowing to put multiple ISOs file in one bootable media. You can create one bootable media for Windows and Linux.


Creating a bootable USB disk comes handy when we have to reinstall our operating system in the case of a system failure. It’s very easy to put ISO files on portable flash drives by using various tools–like Windows USB/DVD tool and the Startup Disk Creator in Ubuntu.


Now, there are many OS available in the market, either free or paid. Each having its multiple versions and features. You can’t waste a flash drive for each of them. It would be great if you put all the ISO files on one flash drive and take the advantage of installing multiple operating systems through a multiboot USB media.


The process to create a multiboot USB disk is quite simple. For Windows OS, these multiboot USB disks can be created using a popular tool known as WinSetupFromUSB. It allows you put multiple ISOs in one installation disk. You can put Windows and Linux in a same bootable disk or create a master installation disk of Windows 7, Windows 8.1, and Windows 10. The choice is up to you.


Before proceeding with the method, if you don’t have the ISO files for Windows OS, the link below would guide you through the process to download them legally.


You must arrange a USB flash drive of considerable size. For putting three Windows ISOs in the multiboot USB disk, you will need a 16GB flash drive.
How to create a Multiboot USB Disk?
Download WinSetupFromUSB. Extract this file.
Connect your flash drive to your computer.
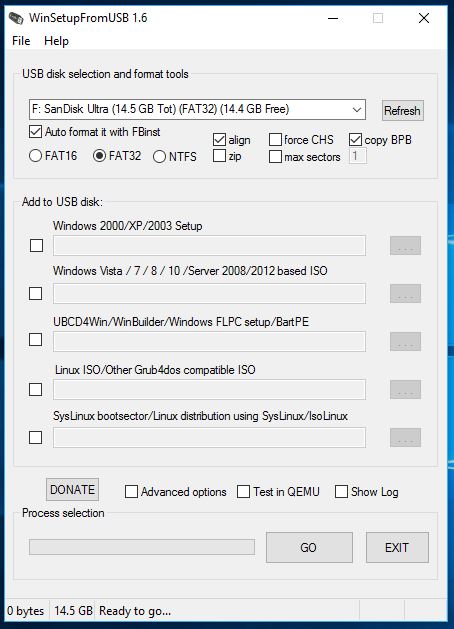
Open WinSetupFromUSB. Open the 32-bit and 64-bit version according to your OS. It will work without any installation.
Make your flash drive is listed and selected in the drop down menu. ClickRefresh, if it is not on the list.
Tick Auto format it with FBinst.
Note: You have to tick this option only for the first ISO installation. Choose FAT32 if your computer is set to boot using UEFI mode or if UEFI sounds strange to your ears. Else, go with the NTFS option.
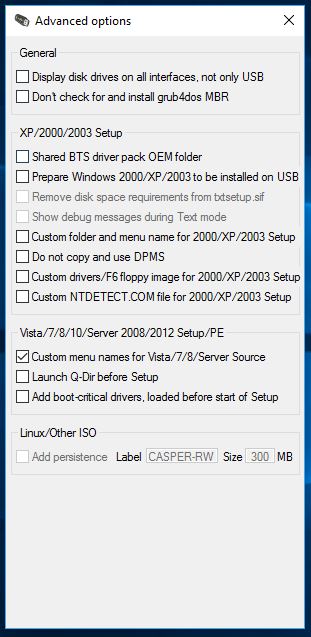
Click Advanced options.
Tick the Custom menu names for Vista/7/8/Server Source checkbox. Click the Cross (X) button to exit Advanced Options.
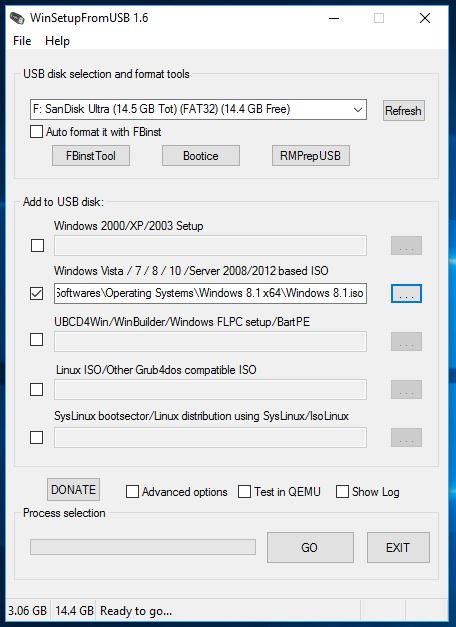
To add ISO, tick the checkbox corresponding to OS in the ISO.
For example, I am using the Windows 8.1 ISO.
Note: If the size of your ISO is larger than 4 Gb, it will show a message to split the file into parts. This is because you’ve chosen the FAT32 option. Click OK.
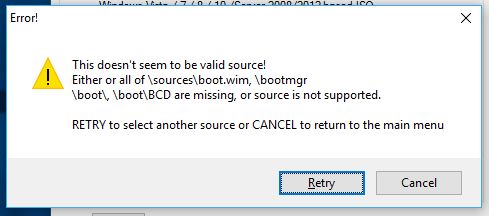
Note: WinSetupFromUSB doesn’t support dual ISOs i.e. it can’t have 32-bit and 64bit version in a single ISO. It will show an error message.
Click GO. A data deletion warning message will be displayed. This is because you’ve chosen to format the flash drive. Click Yes.
Note: Do remember to check the flash drive name before clicking Yes. Else, you’ll end up formatting some other connected storage media.
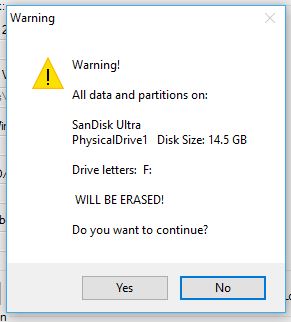
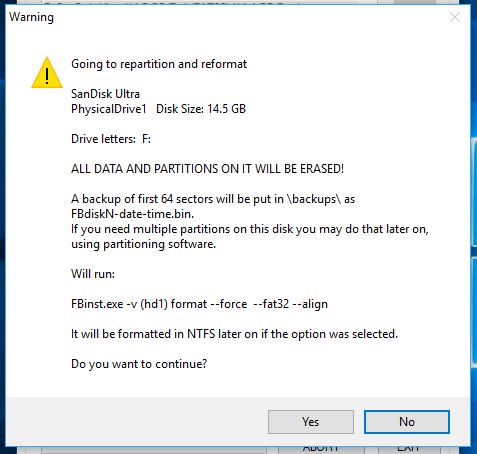
Another warning message will be displayed telling you that all the partitions will be erased. Click Yes.
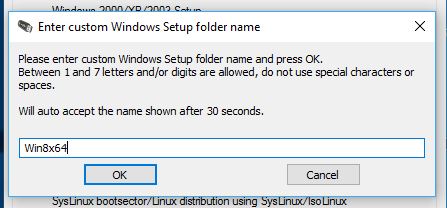
It will ask for the folder name. Type the desired one in 30 seconds or it’ll auto select. Click Ok.
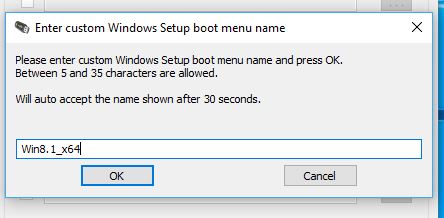
It will ask for the boot menu name. Type your desired name like Windows 8.1 64-bit. Click Ok.
The process will take few minutes to finish.
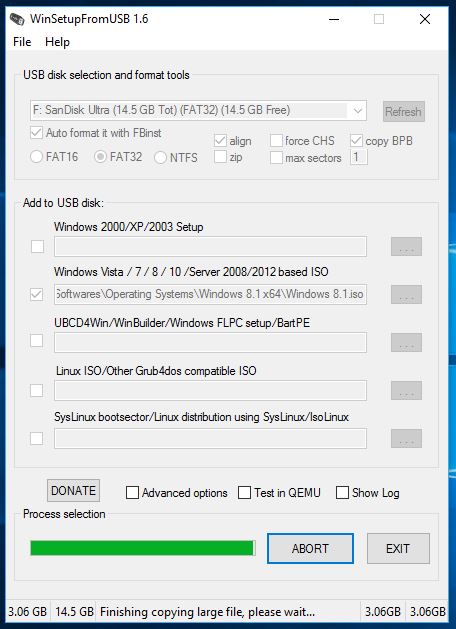
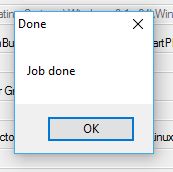
Click EXIT to finish.
How to add the second ISO file in the Multiboot USB Disk?
Start the tool again.
Select your flash drive in the drop down menu.
Click Advanced Options and look for Custom menu names for Vista/7/8/10/Server Source.
Don’t Click Auto format with FBinst. Because it will remove your previous ISO file.
Add the ISO file.
Click GO and follow the same process.


Follow the same process to add more ISO files.


So, this was the method create a multiboot USB flash drive which allows you to choose between multiple operating systems at a time. Use the method to put a 32-bit and 64-bit version of the same OS in one bootable media.


Note: At the time of writing this post, WinSetupFromUSB 1.6 was available. You can use the latest version 1.7 to create multiboot USB.


If you have something to add, tell us in the comments below.