• iPhone7 released

    Apple’s new iPhone 7 and iPhone 7 Plus to come with A10 Fusion 64 bit quad-core processor, new Black and Jet Black colours, AirPods instead 3.5 mm headphone jacks

  • Raspberry Pi Sells 10 Million Computers

    Raspberry Pi Foundation has announced that they have sold 10,000,000 Raspberry Pi single board computers since the first model was launched in 2012. An official Raspberry Pi Starter Kit has also been announced, which can be purchased online via authorized partners

  • Future Samsung Galaxy Phone

    Samsung patent shows smartphone running Android and Windows at the same time

Leawo iOS Data Recovery Powerfully Brings Deleted Files Back from iPhone/iPad/iPod


How to bring your deleted files back from iPhone/iPad/iPod with Leawo iOS Data Recovery tool

I know that many iPhone users have updated their iPhone/iPad/iPod to iOS 10 for a better enjoyment. However, what if you accidentally deleted your text messages, contacts, notes or other important data from your iPhone or iPad during the process of updating? It’s a quite frustrating thing for you to lose the files after updating to iOS 10. Even though you can restore the previous backup from iTunes/iCloud backup, you can’t selectively recover the deleted files from iTunes/iCloud backup. But now, Leawo iOS Data Recovery, a $59.95 program (free feature-limited demo), is proved capable of recovering data from iOS devices, iTunes backup or iCloud backup.

Leawo iOS Data Recovery is desktop software (with separate versions for Windows and Mac) that works with all iOS devices, including iPhone 7. It’s designed to recover and backup deleted data, including text messages, contacts, notes, and more. Additionally, it can quickly scan and extract 14 kinds of files, like photos, videos, contacts, WhatsApp files, calendars, etc. from iTunes and iCloud backups or obtain and backup the 14 kinds of files by directly scanning your iOS devices.


The iOS data recovery tool can recover data in one of the three ways: direct scan, iTunes backup, and iCloud backup. You can choose anyone of three recovery modes that fits your need, since the application provides a short explanation for each mode. The first method can be used as recovering your recently deleted or lost files that haven’t been backed up to iTunes/iCloud. The latter two methods require you to have previously synced your device with your iTunes/iCloud account. And you can restore the most recent backup from iTunes/iCloud backup. For example, you can use it to recover deleted photos from iPhone with the three recovery modes mentioned above.


The above recovery methods can be used for iPhone 7/7Plus/6s/6s Plus/6/6 Plus/SE/5s/5C/5, iPhone 4s, iPhone 4, iPhone 3GS, iPad 1, iPod Touch 4, iPad mini 1/2, iPad Air 1/2, iPad with Retina Display, the new iPad, iPad 2, iPod Touch 5 and iPad 1.

Apart from iOS upgrade, the software can recover data from iPhone/iPad/iPod touch easily no matter the data have been lost/damaged/deleted owing to jailbreak, factory settings restoring, wrong deletion, broken or formatted storage device, or many other unexpected causes.

Leawo iOS Data Recovery also features a preview function, allowing you to preview the deleted files before recovering them so that you can know exactly what you want to recover. This cuts down on unnecessary storage and allows you to verify each item to ensure its value. This feature is particularly useful if you want to recover some large files lost due to accidental deletion.


The company offers a fully functional free trial of this iPhone recovery tool with limited function. The trial version can only scan iOS devices, iTunes and iCloud backup to preview the lost data. Therefore, if you want to try all functions, you need to purchase it at $59.95 to get register code. In addition to the free trial version, the manufacturer also offers a 30-day money back guarantee (with some restrictions) to all who purchase the software. Also if you are Mac users, you can choose Leawo iOS Data Recovery for Mac.

Leawo iOS Data Recovery isn’t perfect, as it can’t recover all of your deleted files, but it allows you to preview and selectively recover the files you need. It indeed isn’t cheap, but if you accidentally delete important contacts or other files, you will know that some things are priceless.

Microsoft unveils a new Nokia feature phone that costs just $37


Microsoft Uncovers New Nokia 216 Mobile Phone, possibly the last Microsoft-made Nokia phone

Microsoft has just unveiled a new brand handset, the Nokia 216. The Nokia 216 is an entry level feature phone targeting the low-end segment, which will be available at the price of $37. This new feature phone is made keeping developing markets in mind.

This surprise announcement from Microsoft comes after the software giant in May had agreed to sell its entry-level feature phone assets to FIH Mobile Ltd, which is a subsidiary of Foxconn technology group and HMD Global, Oy for $350 million.

The Nokia 216 is dual SIM mobile phone that comes with a 2.4 inch QVGA display along with a 320 x 240-pixel resolution and offers 16MB of RAM. It also comes with 16MB of in-built storage and supports microSD card for additional storage up to 32GB. The device runs Nokia’s Series 30 software. Other specs include 0.3MP cameras on both the front and the side. The LED flash of the rear camera doubles as a built-in torchlight.


The device also has a removable 1020mAh battery, which Microsoft claims would offer up to 18 hours of talk time, with standby up to 19 days. You also get the Opera Mini Browser and the Opera Mobile Store, which offers to access Facebook along with other apps and mobile games. It also includes FM radio, MP3, video player and Bluetooth audio support for headset. It can store as many as 2000 contacts.

The Nokia 216 comes in black, grey or light blue. Microsoft plans to start selling the device in India starting October 24. The Nokia 216 is unlikely to make it’s way to the U.S., as the company is expected to announce some new high-end Windows hardware later this year.


How To Speed Up Your Android Phone By Disabling Animations


Very often Android smartphone owner search for options to speed up their devices. Sometimes, the Android animations degrade your phone’s performance. By enabling the Developer options and changing a couple of simple settings, you can disable animations and speed up your Android phone in few steps.


Android operating system allows the OEMs to change the look and feel of the software by incorporating different themes, icons, and animations. Apart from improving the aesthetics, these elements also improve the overall user experience.

With each new version of Android, Google rolls out new types of animations. However, if you don’t own a powerful hardware, these animations can become a curse. They can irritate you due to their slow speed at which they play when you click on some icon. So, for some users, these animations act as performance killers rather than improving the overall experience.

I’m pretty sure that such frustrating situations have been faced by many of you. However, Android doesn’t provide you a direct option to turn these animations off. To speed up your Android phone by disabling animations, you need to enable the Developer options and find relevant settings. By making these changes, you should notice an immediate performance improvement on your Android device.
How to disable animations on your Android smartphone?

I’ll be explaining how to disable animations in simple steps. Please read ahead:
Enabling Developer options:
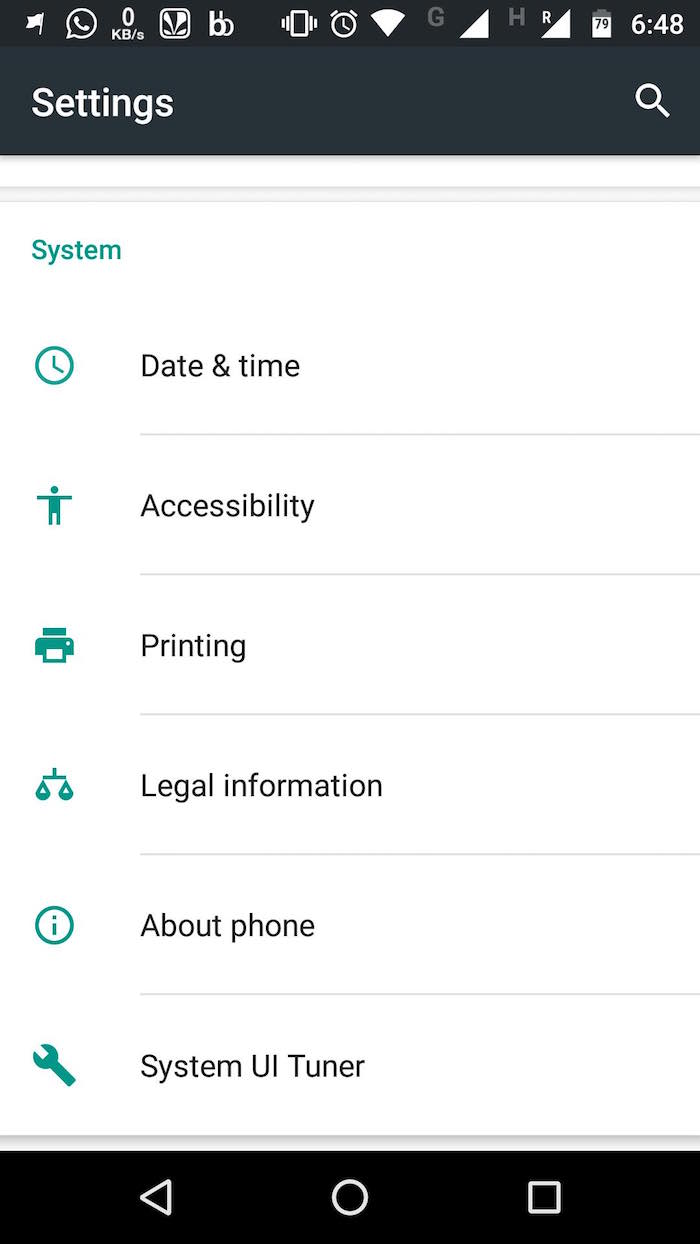
To make these changes, first you’ll need to enable the developer mode on your Android smartphone. It’s hidden by default and you need to make some changes to enable it. To do this, open the Settings screen and scroll down to the bottom. There, tap on the About phone option.
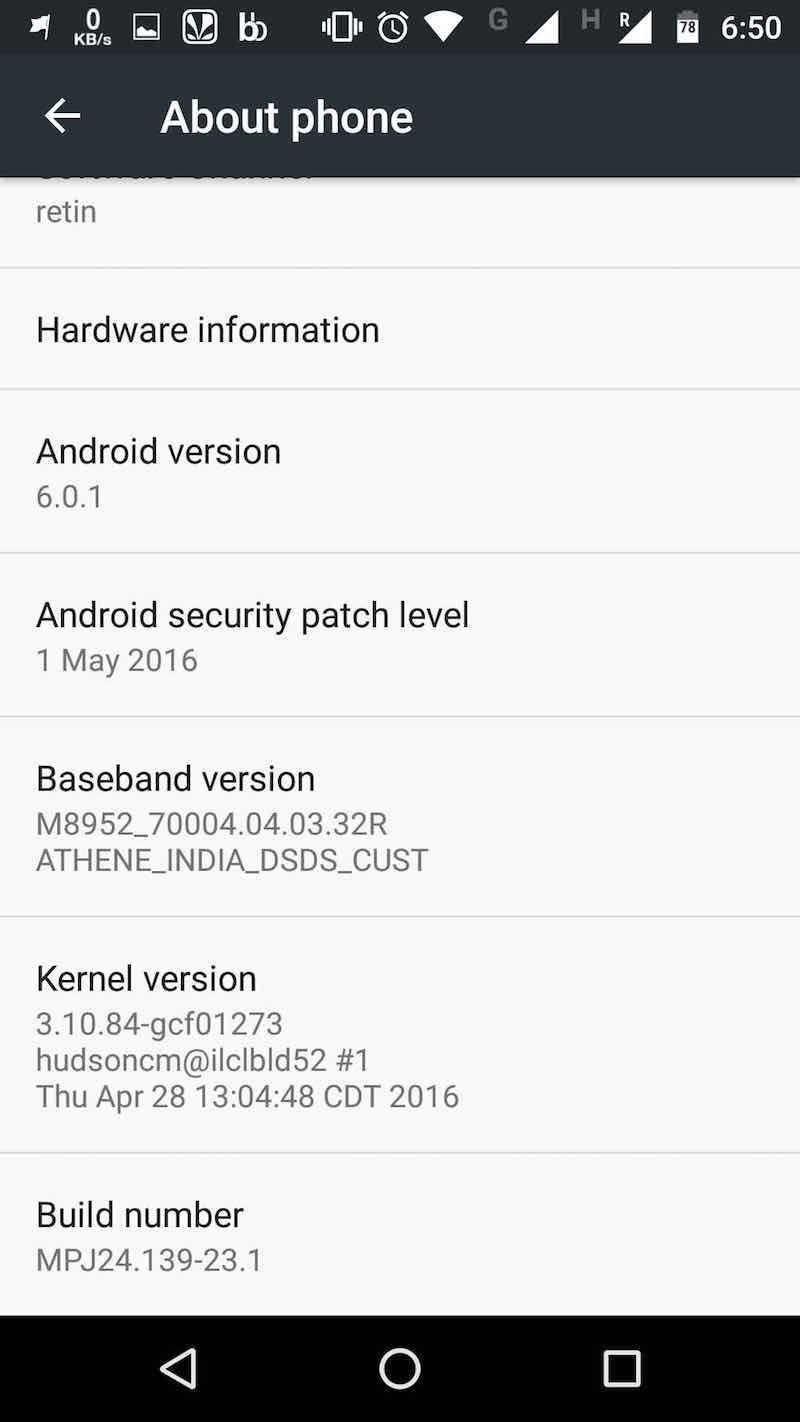
In this window, again scroll down to the bottom and look for Build number. Tap this field repeatedly.
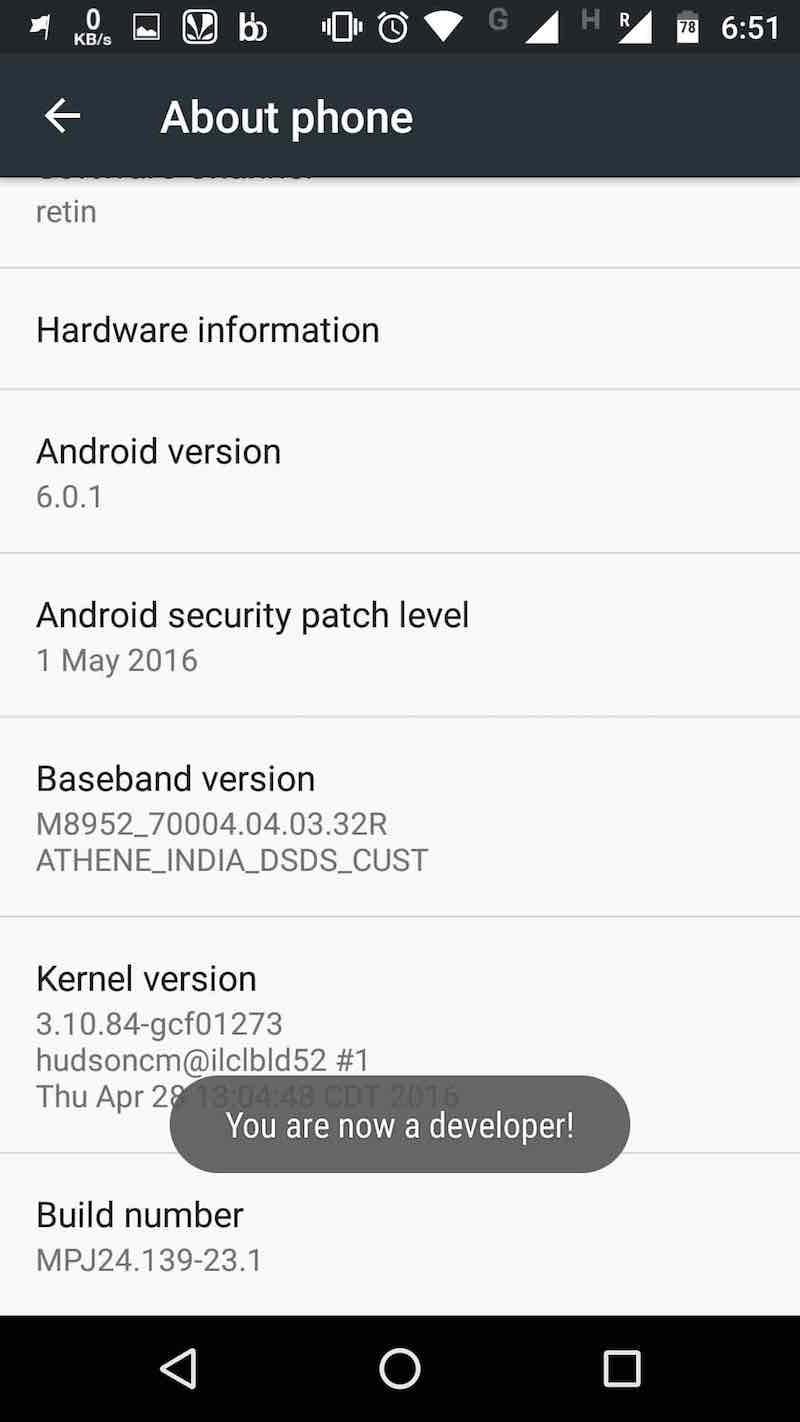
After tapping few times, you’ll be seeing a message — “You are now a developer“.
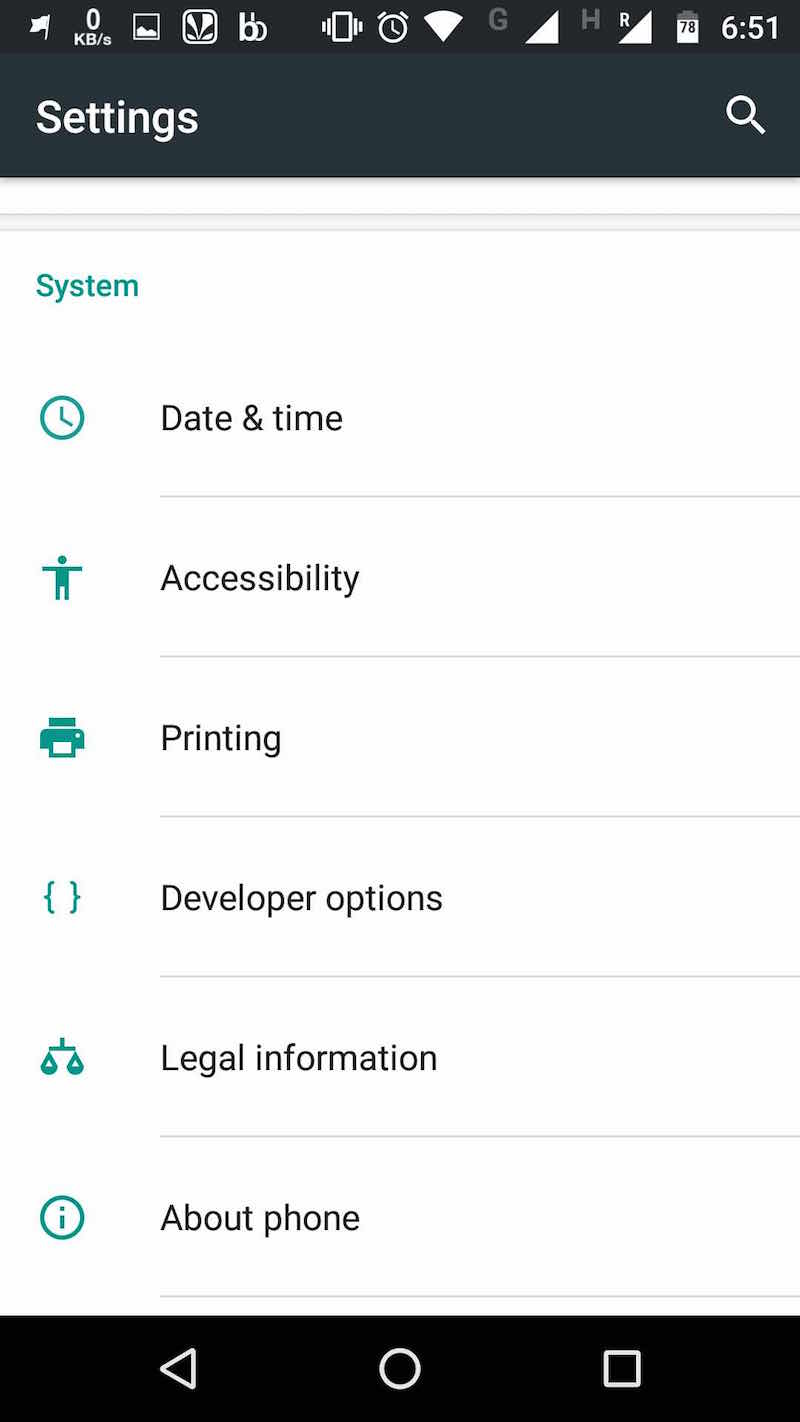
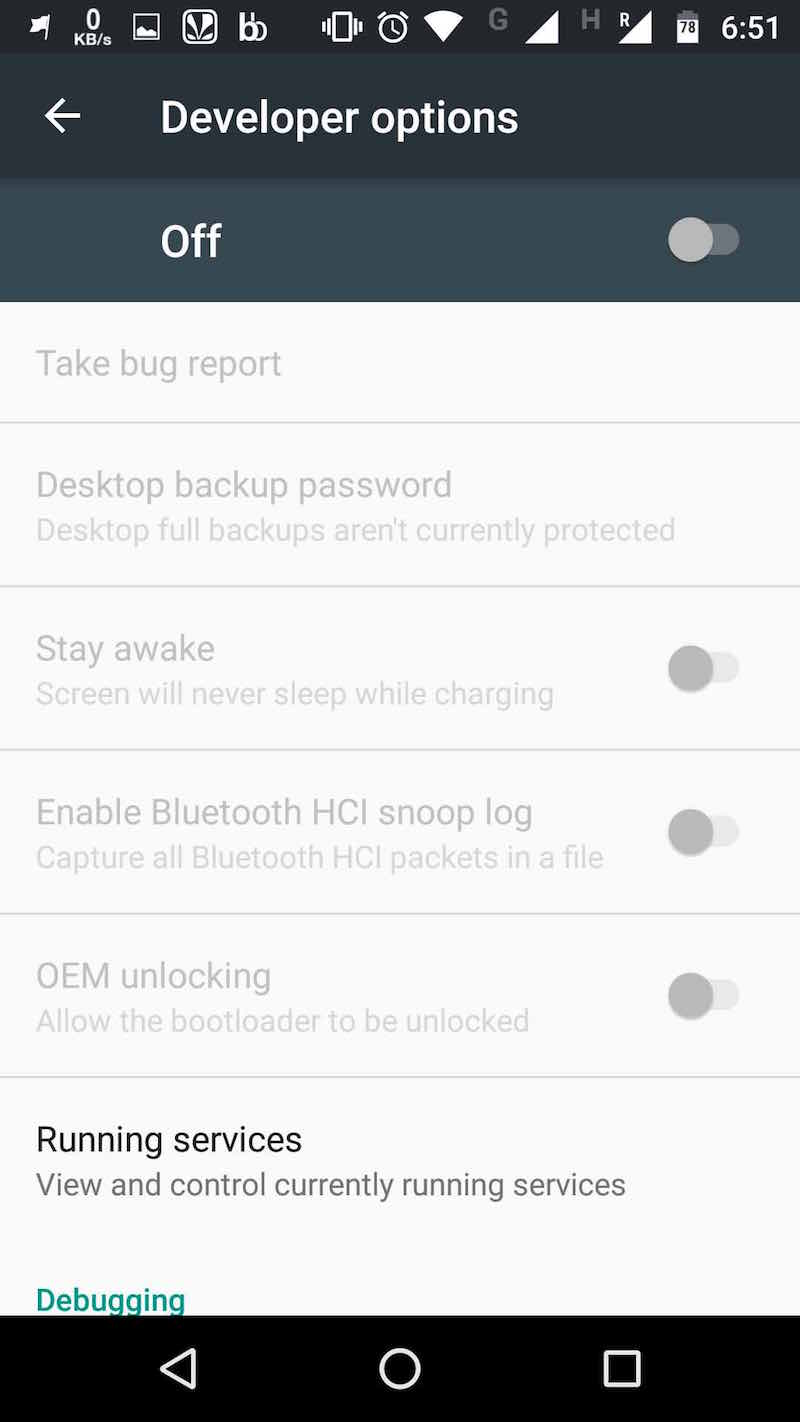
Now, you need to go back to the Settings screen and scroll to the bottom. There, you’ll be able to spot the new Developer options field. Now tap on it and proceed with the process to disable the animations in your Android smartphone.
Disabling the animations:
After opening the Developer options screen, you need to turn On the option by sliding the switch at the top. This will enable the hidden options and allow you to make changes.
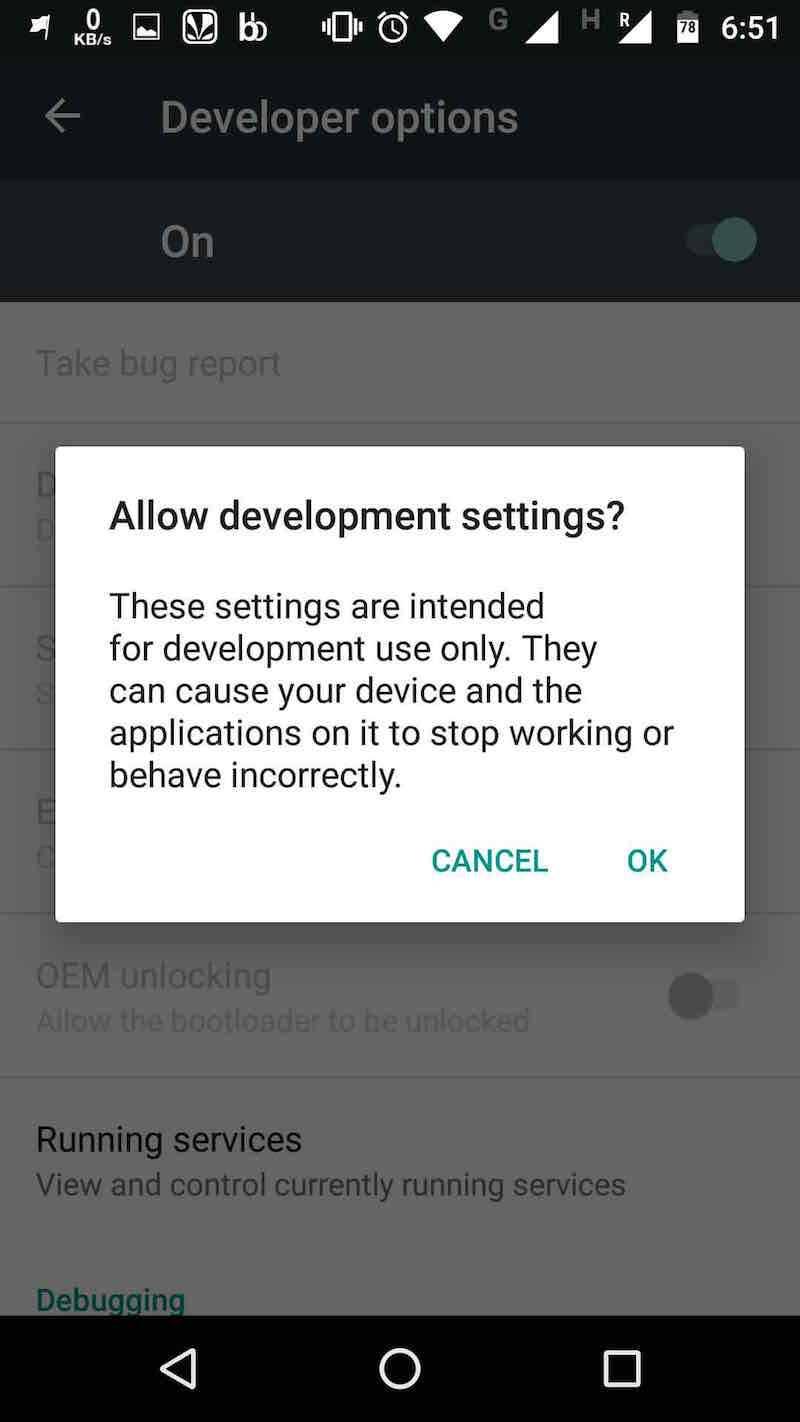
You’ll see a small dialog asking you to allow development settings. Tap onOK and proceed to disable animations on your Android smartphone.

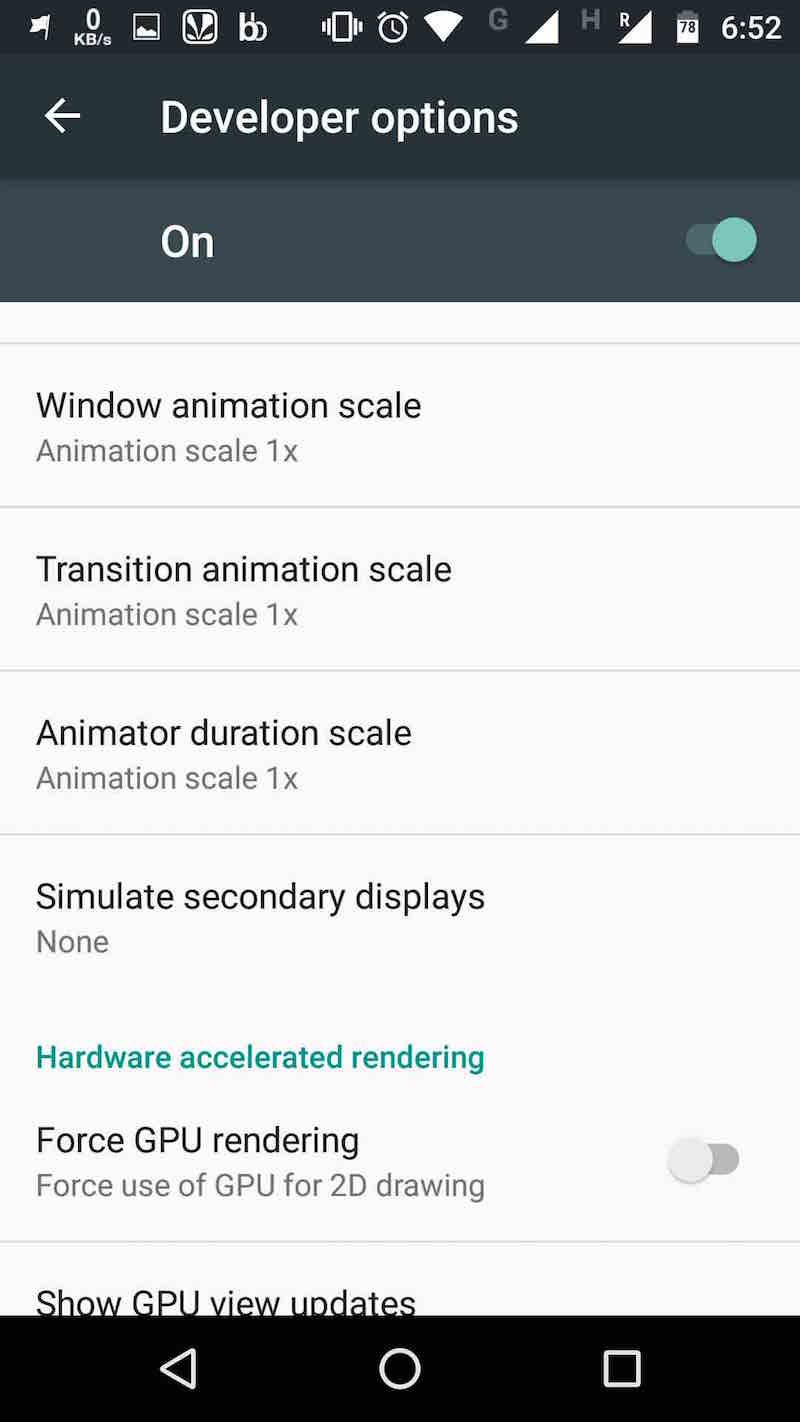
You need to scroll and down in this screen and look for different options with animation keywords. You’ll be spotting different options like Window animation scale, Transition animation scale, and Animator duration scale.
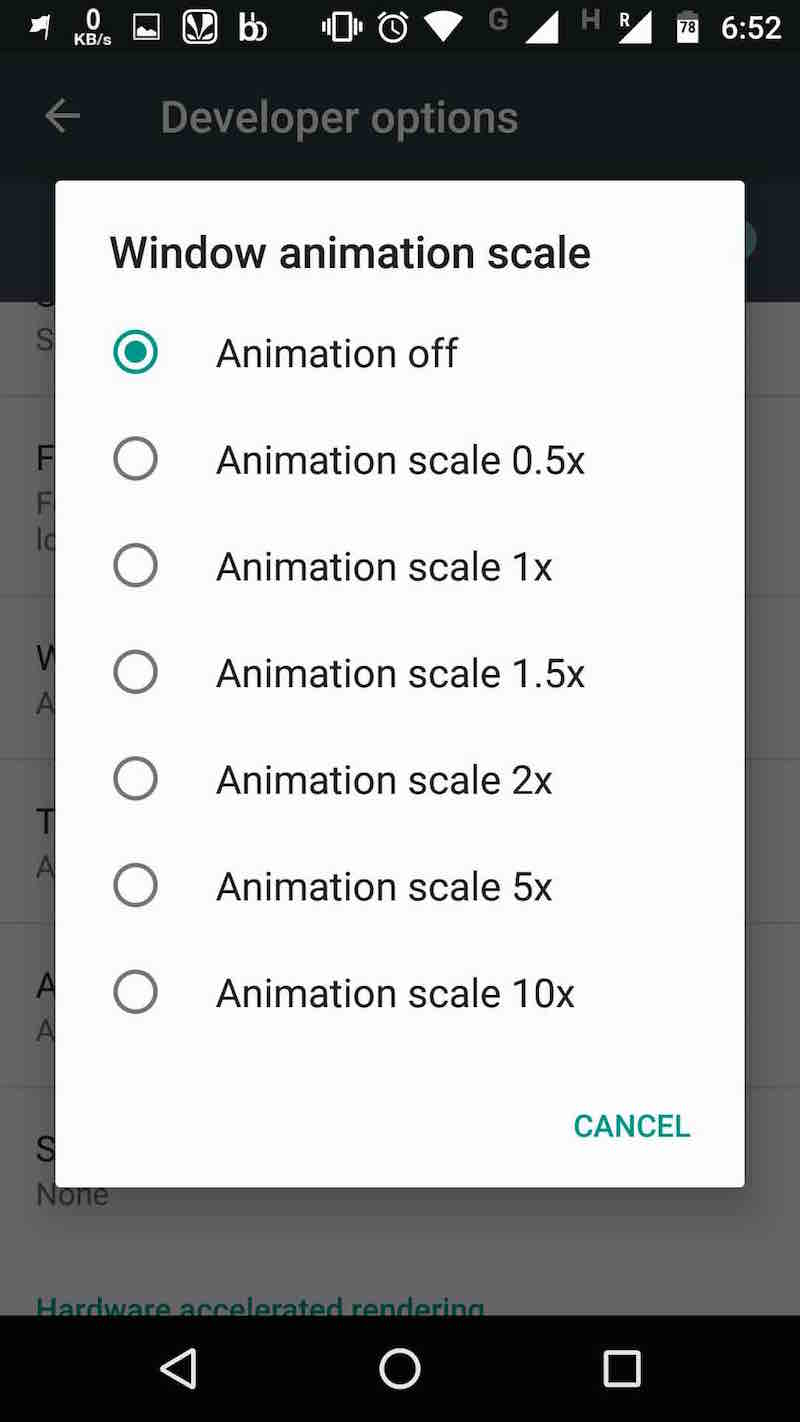
Now tap on each of these options and select the Animation off option. Please note that the default value is set as 1x. So, if you want to speed up your phone without entirely disabling the animations, you can select the Animation scale 0.5x option. This will boost the speed of animations and your phone’s speed.
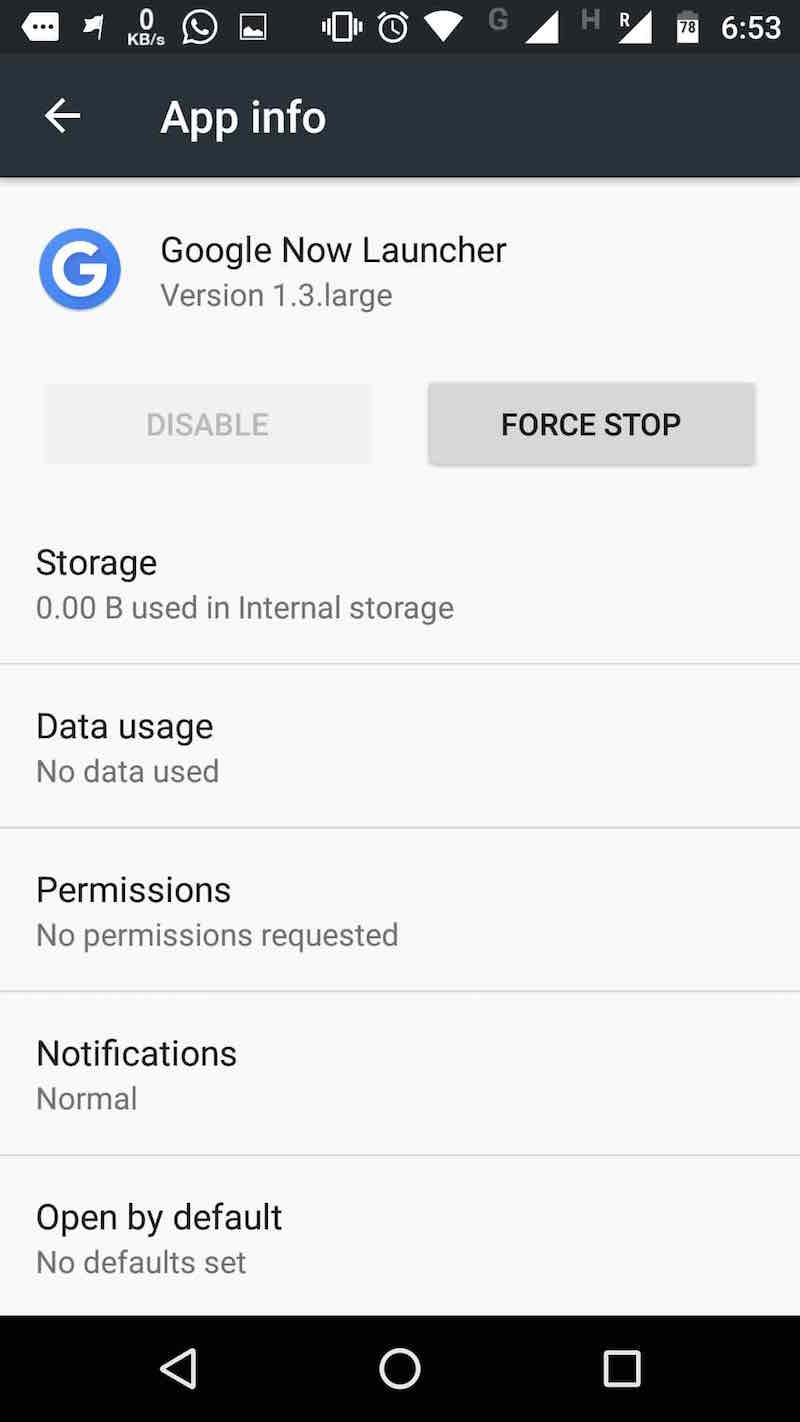
These changes won’t take effect immediately. For that, you’ll need to restart your Android launcher after making the animations changes. To do so, open the Android launcher app from the Apps option in Settings, and select the Force Stop option. Now tap your Android smartphone’s home button and
it’ll relaunch your Android launcher.

After applying these simple steps, the animation effects in your smartphone will be disabled and you’ll notice a speed improvement. So, from now on, if you’ll tap on some app or make a transition to another screen, the change will take place as soon as possible. Now, you phone won’t play animations and use processing juice to render them.

Important: Please note that the extent of speed improvement also depends on your Android phone and its hardware capabilities. If completely turning off animations causes some problems in certain apps, decrease the delay to 0.5x.

Did you find this article helpful? Don’t forget to drop your feedback in the comments section below.

Facebook Messenger May Have Public Chat Room Features Soon


Facebook Messenger’s source code discloses hidden Rooms feature


According to speculations, Facebook Messenger app may be very soon launching a feature called Rooms. A developer discovered references to the Rooms project within Facebook’s existing source code, which would allow friends and strangers to chat via public Facebook Messenger groups, reports TechCrunch.

TechCrunch has found mentions of public chats within Messenger’s code, which includes a logo and a description of the service. The hidden code reads, “Rooms are for public conversations about topics and interests. Each room has a link that can be shared so anyone on Messenger can join the conversation.”
TechCrunch also reported that some of its readers were able to launch a chat room with both friends and strangers, with an admin screen showing some features currently unavailable on regular group messages.
Initially, when contacted by TechCrunch, the social networking giant refused to comment on the Rooms feature. However, after being sent screenshots of the code showing how users are able to join Rooms and chat using the features and interface of Messenger, Facebook said, “We often run small tests — nothing else to share beyond that.”
The idea of chatrooms is nothing overly innovative. This is something that Facebook has attempted back in 2014, which was shutdown in 2015 as it was unable to garner much traction. The Rooms app allowed users to talk to others who share the same interests as them but in complete anonymity.
We will have to wait and see if Facebook releases the Rooms feature for Messenger in the near future. Are you excited about this new feature? Do let us know in the comments mentioned below.
Source: TechCrunch

Remix OS Player Makes It Simple To Run Android Games In Windows


The popular Android-based Remix OS for PC is now available as an emulator application for Microsoft Windows OS. Known as Remix OS Player, the free application can be used to download and run Android apps and games on your computer without installing a separate OS.

You might be familiar with the Remix OS, an Android-based operating system for ARM and x86 platform. It lets you run Android apps and games on your computer. In fact, you have the complete Android with the advantage of a mouse, keyboard, a bigger screen, and powerful processing.

Jide Technology, the maker of the Remix OS for PC, has transformed the popular light-weight OS to an emulator. Now, the Remix OS Player can be installed like a software on an existing operating system. This gives you the advantage of having Android with other powerful operating system like Windows and saves you the effort of dual-booting your machine.

Remix OS Player is not something that has been done for the first time. We already have names like BlueStacks. But the thing which sets it apart is that it’s based on the Android Marshmallow. Many other Android emulators are based on older Android versions like Lollipop and even Kitkat.

Using Android on your computer also has other perks. You have the freedom of using multiple apps at a single time using the windows in Remix OS Player. So, you can multitask and play more than one game at a single time. Also, just like the Remix OS for PC, the Remix OS Player is free of cost.

System Requirments for Remix OS Player
Processor: Intel Core i5/i7 (Minimum: Intel Core i3)
RAM: 4GB or higher
Operating System: Windows 7 and later.
Storage: 16GB (Minimum: 8GB)

Currently, the Remix OS Player is not compatible with AMD processors and you also need to enable hardware virtualization in your BIOS settings.

You can visit Jide’s website for the download links. Try the Remix OS Player on your machine and let us know about your experience in the comments below.

How To Compress Drive To Save Disk Space Using NTFS Compression?


Microsoft Windows has abilities to compress your hard drive. The compression works for the drives formatted using the NTFS file system and for folders resting on an NTFS drive. You can also use NTFS compression on a pen drive by formatting it to NTFS.


The NTFS compression feature present in the Windows operating system comes handy when you want to squeeze your existing data to get some extra space. There are other useful methods for data compression but these require the data to be packed inside a zip or RAR file.


Shrinking files using NTFS compression will increase the workout done by your CPU while decompressing it. However, modern CPUs won’t give a sweat on this. Compressing the files won’t increase the access time. Instead, it may contribute lesser access time. This is because the files are first transferred to the RAM and then decompressed. A small-sized file could be transferred more quickly than a larger one.


An important point to be noted is that the compressions will only work for the stuff which can be compressed. This means that audio and video files, which are already compressed, won’t get shrunk considerably than the uncompressed ones like the word files and PDFs.


However, using NTFS compression on system files may not be beneficial to the health of your system. It may contribute to degradation in performance. It is not recommended to do so.
How To Compress Drive To Save Disk Space Using NTFS Compression?


The drive that needs to be compressed should be formatted to use the NTFS file system. External storage devices like USB drives are formatted using the FAT32 file system. So, you’ll have to reformat it in order to enable NTFS compression.


Here are the steps to enable NTFS compression in Windows:
Open My Computer/This PC.
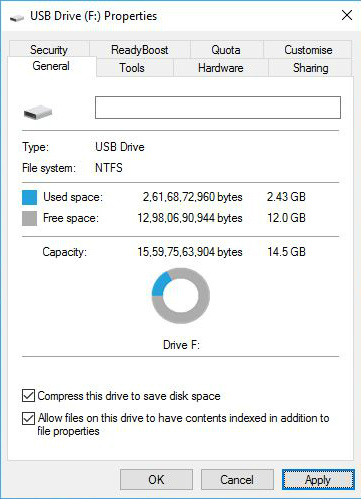
Right-click the desired drive and click Properties.
Tick the checkbox for Compress drive to save disk space. Click Apply.

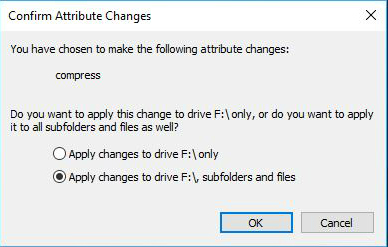
Tick Apply changes to folder, subfolder, and files. Click Ok. It will take some time depending the size of your drive.

To undo NTFS compression, untick the Compress drive to save disk space check box and follow similar steps.


Recommended: FAT32 vs. NTFS vs. exFAT – Difference Between Three File Systems
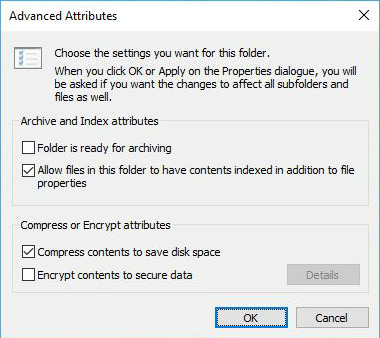
How to compress contents of a folder to save space?
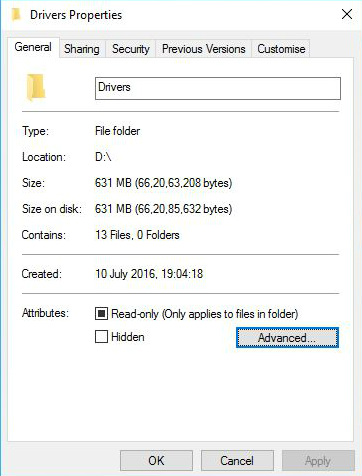
Go to the Properties of that folder.
Click Advanced.

Tick Compress contents to save disk space.

Click Apply changes to this folder, sub folders and files. Click Ok.
To undo NTFS compression, follow similar steps and untick Compress contents to save disk space.


Using NTFS compression to compress drives won’t drastically reduce your disk size. But it is good in the situations when you are out of space and want to store some important data, and also for keeping the files which you don’t use very often.


If you have something to add, tell us in the comments below.

How to Repair/Fix a Corrupt SD Card


Here is how to repair and/or fix a corrupt SD Card

How to Preserve your important and precious data from being corrupted and recover from accidental deletions

SD cards are great as they are small in size, lightweight and versatile (you can store any type of data on them). But what happens when a SD card on which you stored your important files, becomes inaccessible or corrupt and what about a SD card whose entire data got wiped out for no apparent reason.

We all face such kind of situation when our smartphone/PC/laptop throws up a message that it can’t access the SD card. Such situations are scary as we don’t have any access to the important files stored on the SD card. At least for those who store important files/videos/images in their memory card).

However, almost every problem has a solution. There are solutions to each of the specific data loss case. Most common of them are provided below.

I just can’t access my SD card

This is one the most common issue that readers complain about. Maybe this is a problem with other hardware that is your computer’s USB port or the card reader you’re using. Try connecting your card reader on a different port of the same computer or do it with a different computer. Also, you can try using a different card reader.
The Computer Shows my card name but not the content

If in case the content of the card is not being shown, you can try this:


1. Open the search bar and type “cmd”.
2. Click on “Command Prompt” or “cmd.exe”
3. Type in “chkdsk /X /f sd card letter:” or “chkdsk sd card letter: /f “, for example,”chkdsk /X /f G:” or “chkdsk H: /f”.

Windows will check and fix the file system of the SD card. It will take a few minutes. If you see a message saying “Windows has made corrections to the file system” in the command window, then you’re done. Otherwise, you will have to use some third-party data recovery software.
Formatting the SD card

If the data contained on your card is not very useful or important, you can format the card to wipe all the bloating stuff.

To format your card, follow these steps:


1. Locate your SD card on your computer.( Usually its the last drive letter in “My Computer”)
2 Right click on its drive letter.
3. Select Format.
4. Select “Start”.
5. If you encounter any problem, retry with “Quick Format” box unchecked.
Using a data recovery software

The best way to get back all your important data will be to use a decent data recovery software. There are numerous software available. Some of them, which are considered to be “best-in-class” are listed.
1. Recuva (Experts recommend it as it is economic and does the job well)
2. Prosoft’s Data Rescue(Voted as best commercial data recovery software in 2016)
3.MiniTool Partition Recovery

These methods will help you get back your invaluable data back. Be sure to copy your data to a new SD card as soon as you recover your data as the problem you began with may trouble you again.